This is what happens when you don’t have a clear answer for a problem.
What you see before you is the remains of the dash of Mom’s 2000 Dodge Caravan Sport. It’s been in the family since new. Since 2016, it has been inconsistently leaking rain water in the passenger footwell area, leaving me to vacuum it up and use newspaper to dry what’s left for the following days. Confusingly, it fixed itself. Years passed and the Caravan is still with us. And the leak came back. By this time, I’ve finally found a good shop and decided to let them take care of it. They did. I was told that the plastic housing of the A/C box (that holds the blower motor, blend doors, some ducting, stepper motors, etc.) was cracked and the best course of action was to close the A/C door leading outside and just run the A/C in recirculating mode.
I accepted this.
Then the leak came back.
I got angry.
Angry enough to refuse to take the Caravan back to the shop for this and instead tackle it myself, fueled by the thought that they’ll find a way to charge me a not-insignificant amount of money for the job; instead of risking spending even more money on a car that Mom is sick of spending money on, I’ll spend my time on it instead. Also, the returning leak was the last straw when it came to a number of less-than-stellar repair results on the Caravan; a rash of defective front struts and not finding the root of an unintended shut-off while at idle (that’s next on my list). That shop is good, and I’ll continue to go there, but the luster of professionalism they once exhibited has dulled. They’re still better than the last place, though (the mechanics took it to get lunch).
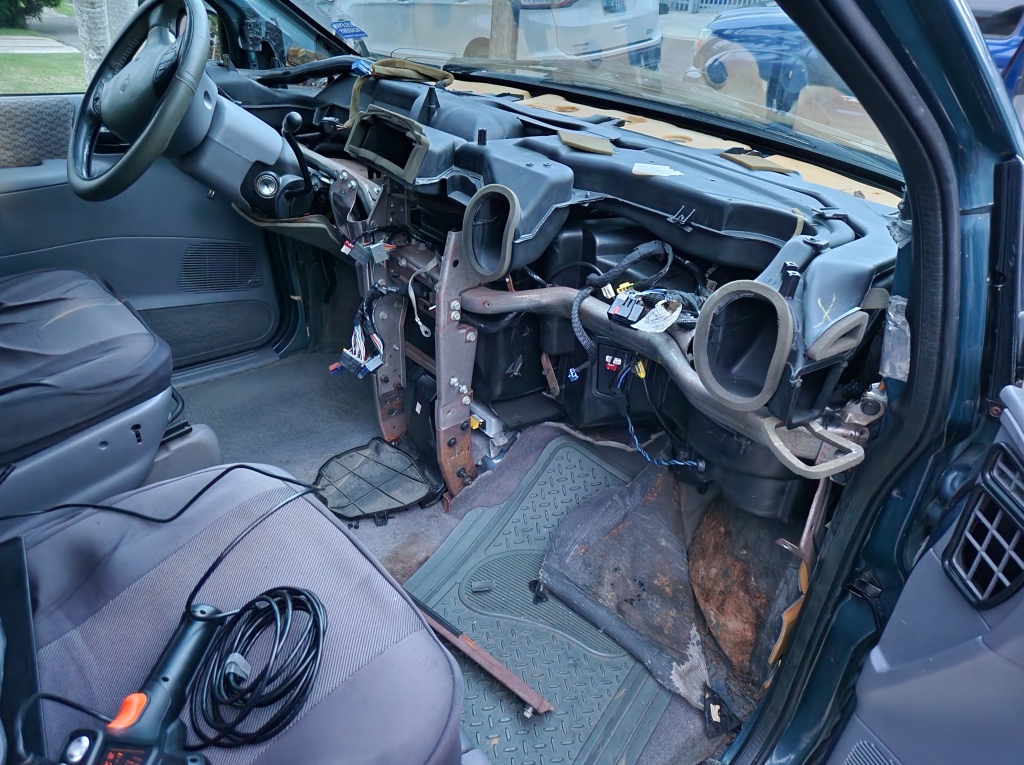
I tried to come up with a game plan, but I was unable to find a proper dash removal step-by-step procedure online, just little to no pictures and not-that-helpful descriptions. A 3rd-gen Dodge Caravan may be a mass-produced vehicle, so it does benefit of some online info, but it doesn’t tickle the fancy of automotive enthusiasts the same way as, oh, a Ford F-series Super Duty.
Junkyard-sourced parts have always been hard to find for these, as I’m always on the lookout on the rare occasions I managed to go to them. I can only assume that demand is so low on 3rd-gens that junkyards just send them to get scrapped, even fairly complete ones (this happened to me once. One week, a Caravan Sport was there; the next, gone. I asked). The biggest junkyard on the island had only one remaining, and its crash damage negated the use of its A/C box (how was its dash pad and headliner intact from the hot Caribbean sun, I have no idea, maybe the moss-caked windows helped with the UV protection). And yet, for some reason, 4th-gen Caravans are plentiful!
The video above is perhaps the most helpful piece of information that I’ve found for removing the dash. The audio may not have been the best, and it was just about all timelapse, but it did help with pointing out some hidden nuts and screws.
With what little info I could find (focusing on heater core removals), I took my screwdriver, socket set and rage and went to town. I let my anger and frustration get the best of me, giving me tunnel vision. I pushed through under the high-noon sun, under the Caravan’s huge windshield (yes, I took breaks). I didn’t tag-and-bag anything. No pictures, either. Rarely was I able to put the screws back where they came from, so I just piled them up by section. Noticing that there were two predominant screw designs (of the same thread pitch, to boot), I just made mental notes of those few unique screws and odd locations.
I knew there were screws that were never going to be placed back: the tortuously placed ones and those that no longer held anything due to broken tabs. It fueled my rage that the probability of such damage was caused when the aforementioned shop worked on replacing a broken e-brake handle cable over a year ago. Superglue couldn’t fix these areas. Plastic welding could, but I just wanted to put the thing back together instead of waiting for a new tool with a learning curve to arrive by mail. Ultimately, there was more than enough mounting locations to take up the slack of a couple of broken tabs and subsequently missing screws. After putting everything back together, even after crawling all over and under the dash, 9 screws of three different designs (still the same thread pitch) remained. The dash didn’t rattle or anything on the test drive afterwards.
Besides the little info I gathered, it wasn’t as if I was entirely Caravan dash-illiterate. I’ve replaced the cracked dash pad and a blown twitter. The radio was replaced with used factory ones a couple of times (FM channel seems to always go). I once took off the A/C controls off due to a misdiagnosis on my part (the lack of fan speeds was because of a relay… and a burned-out plug). But the more parts I took off, the more I needed to take off as well. The screw piles grew. And grew! My drive started to wane and a bit of anxiety started creeping in. I wasn’t finding any screws or nuts that held the dash in place; the type of hardware that upon removal would remove the entire assembly in one unit, thus allowing me to start looking for the actual fault. This meant that I had to keep taking things apart until I did. But I was hitting roadblocks on the removal of some parts, like the top-side A/C ducting, stalling progress.
While contemplating on how to get to the three nuts holding the dash to the firewall behind the engine, my focus shifted to where the leak came from: the passenger footwell. I removed the A/C blower motor access cover, disengaged the blend door motor, put my arm though the blend door opening. This led to another chamber, so I started feeling around.
I found a pool of water!

It all made sense. Rain water would accumulate in this inner chamber. When full, the excess would cascade down, through the blend door, pool into the fan access cover and then leak onto the carpet and its jute backing. That’s why the carpet didn’t get wet every single time it rained or when I washed the Caravan itself. Even testing with a garden hose would produce inaccurate results if one was stingy with the water, or didn’t point the stream in the right area.
There just had to be a hidden drain plug stopped up. I absorbed all the water from the chamber with rags. Before continuing, I dumped water in the windshield cowl. Yep, it went into the chamber. After absorbing all of that out as well, I started to feel around. There was this rubber grommet in there. I got my little Depstech borescope out to confirm. It was a rubber grommet alright, but it looked solid. With a pick, I started poking it, and the pick went straight through! I filled a water bottle and dumped it into the chamber. Instead of pooling, it was draining out underneath a hidden drain passage in the unibody.
The problem that’s been plaguing the Caravan on and off since 2016 has been solved.

The drain doing its job properly.
Before we continue, it must be said that 3rd-gen Caravan, Voyager and Town & Country minivans suffer from this. Everywhere online mentions that to avoid water in the footwell, one must clean the windshield wiper cowl drain tubes, the ones with corrugated tubes connected from the wiper cowl that drain water deep into the engine bay. What no one tells you is of the inner drain (either no mentions it or my reading comprehension skills have gotten worse since high school). If the inner drain was mentioned even half as often as the wiper cowl drain tubes, I would’ve just gone straight to the A/C blower motor access cover and blend door.
Instead I ended up with a dismantled dash that had to be put together.
I dedicated my free time to put it all back together. From start to finish, it took me a week and a half due to weather, my superglue fix attempts, important family outings, and some of my laziness getting in the way. Aside from the mosquitos, putting the dash back together was a rather pleasant experience. The last afternoon I was so fired up that I continued on until nightfall, using a quality headband-mounted flashlight to finish it all. Few times have I felt like a true automotive enthusiast as I did that night. I celebrated eating at Firehouse Subs.

All put together now. Just needs a good vacuum. What you see on the floor is broken off factory insulation foam, electrical cloth tape and broken plastic tabs from my failed superglue fixes.
I may not have learned to totally take out the dash of the Caravan out, but if it still manages to stick around with the family a while longer, I’ll be able to dive into the dash if things like the blend door stepper motors give out. Maybe I’ll even tackle the heater core without removing the steering column shaft. Hopefully not anytime soon, though.
–Tigerstrypes
